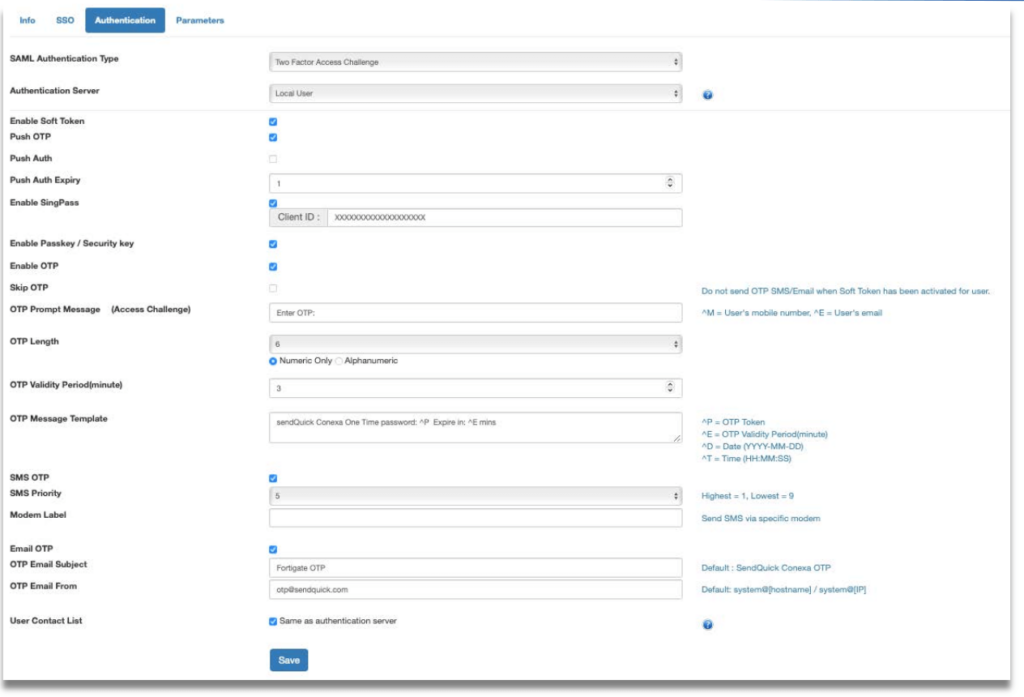
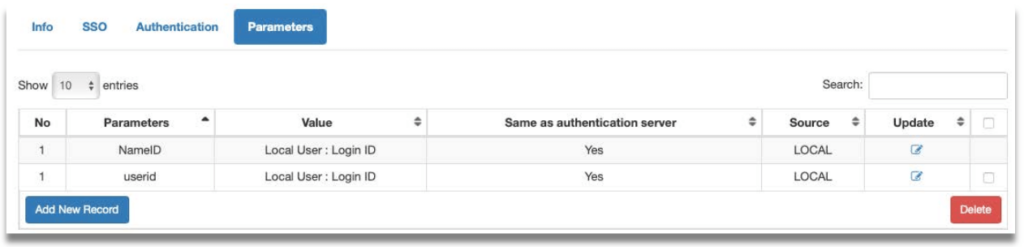
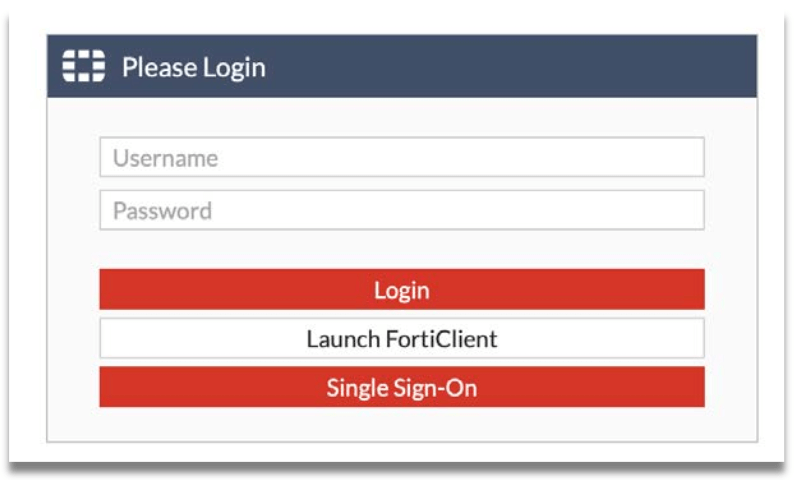
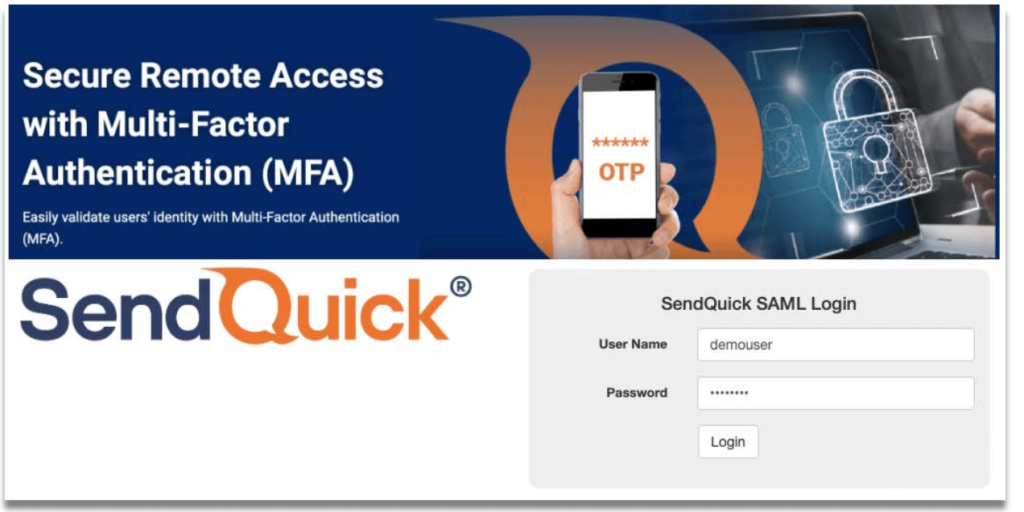
Fortinet FortiGate – SendQuick Conexa Integration Guide

Contents

1. Purpose of Document

This document is prepared as a guide to configure FortiGate to integrate with SendQuick
Conexa for multi factor authentication. FortiGate can use either RADIUS or SAML to
connect with SendQuick Conexa.

For RADIUS connection, ensure that both applications are using the same port for Radius.SendQuick Conexa OTP server is configured with RADIUS on port 1812.

For SAML connection, SendQuick Conexa need to be accessible from the Internet to host the SAML login portal for user login.

2. Create User on SendQuick Conexa

Prior to configuring the connection via RADIUS or SAML, we must first create the user in
SendQuick Conexa.

2.1 Creating user on SendQuick Conexa (Local User authentication)

SendQuick Conexa can authenticate user by authenticating against local user database, Active Directory/LDAP, external Radius server and remote database server.

For this guide, we will create a local user as an example.

Step 1: On the SendQuick Conexa dashboard, navigate to
User Management > All Users

Step 2: Click on New User

Step 3: Fill in the following fields:

  1. Login ID 
  2. Username 
  3. Password 
  4. Confirm Password 
  5. Mobile Number 
  6. Email 
  7. Role
Figure 1 Creating “User” under Local User
2.2 Create Soft Token user (SendQuick OTP)

This is to create a user to be able to login using soft token. We will be using SendQuick OTP app as the soft token.

Step 1: On the SendQuick Conexa dashboard, navigate to
Soft Token Management > Soft Token Users

Step 2: Click on New User

Step 3: Fill in the following fields:

  1. Login ID
    VPN / WebOTP
    – Allow this soft token user to login to All or single VPN profile
    by selecting from the dropdown list.
  2. Method – Check SendQuick OTP and/or Singpass (Singpass is only available
    for SAML profile)
  3. Email – After activated, user will receive soft token QR and/or Singpass
    registration link to this email.
  4. Mobile Number –After activated, user will receive SMS notification to this
    number.
Figure 2 Add Soft Token User

3.0 Configuring Radius for OTP

To use Radius method, we first configure SendQuick Conexa as the Radius server and FortiGate as the Radius Client. Before the configuration, you will need to know the IP address/hostname for both systems.

3.1 Configure Radius Client on SendQuick Conexa

On SendQuick Conexa, configure FortiGate as the Radius Client.

Step 1: At the SendQuick Conexa dashboard, navigate to the following:
Radius OTP Configuration > Radius Client Configuration

Step 2: Click on New Radius Client

Figure 3 Add New Radius Client

Step 3: Fill in the following fields:

  1. Radius Client IP – This is the IP Address of FortiGate system.
  2. Name –Create a unique name to identify this Radius Client.
  3. Shared secret – Define a shared secret key that needs to be configured later in the FortiGate system.
Configure Radius Client
Figure 4 Configure Radius Client
3.2 Configure Radius Server on FortiGate

On FortiGate, configure SendQuick Conexa as the Radius Server.

Step 1: Go to User & Authentication > RADIUS Servers and click Create New.

Figure 5 Create a new Radius Server Profile

Step 2: Set Name to ConeXa.

Step 3: Set Authentication method to Specify and select PAP from the list.

Step 3: Under Primary Server, set IP/Name to ConeXa IP and Secret to the same shared secret configured in ConeXa radius client configuration.

Figure 4 Configure Radius Server Profile

Step 5: Click Test Connectivity to test the connection to the server, and ensure that Connection status is Successful. Optionally, click Test User Credentials to test user credentials.

Figure 5 Test RADIUS user credentials
3.3 Add User Group on FortiGate

Step 1: Go to User & Authentication > User Groups and click Create New.

Step 2: Set Name to “radius-group”

Step 3: Under “Remote Groups” click Add and add ConeXa radius server.

Figure 6 Add User Group
3.4 Configure SSL VPN on FortiGate

Step 1: Go to VPN > SSL-VPN Settings

Step 2: Select the Listen on Interface(s) and set Listen on Port.

Step 3: Under Authentication/Portal Mapping, Create New Authentication / Portal Mapping. Add radius-group and set to full-access.

Figure 7 Add User Group to SSL VPN
3.5 Configure Firewall Policy on FortiGate

Step 1: Go to Policy & Objects -> Firewall Policy

Step 2: Click Create New.

Step 3: Fill up the following fields:

  1. Name
  2. Incoming Interface
  3. Source
  4. Destination
  5. Service
Figure 8 Configure Firewall Policy
3.6 Add VPN Configuration on SendQuick Conexa

Configure VPN profile on SendQuick Conexa to link to the FortiGate Authentication Profile.

Step 1: At the SendQuick Conexa dashboard, navigate to the following:

Radius OTP Configuration > VPN Configuration

Step 2: Click on Add VPN

Figure 9 Add new VPN

Step 3: Fill up the following fields:

  1. NAS-IP/NAS-ID – NAS-IP-Address or NAS-Identifier used in the Radius request. It is usually the FortiGate interface IP or the Radius authentication profile name that was created earlier.
  2. Name – Create a unique name to identify this VPN configuration.
  3. Authentication Type – Select Two Factor Access Challenge from the dropdown list.
  4. Check the following boxesEnable Soft Token & Enable OTP.
  5. OTP Delivery Method – Select SMS & Email.
  6. User Contact List – Check Same as Authentication Server.
Figure 10 VPN Configuration
Figure 11 VPN Configuration (continue)
3.7 Accessing FortiGate SSL VPN Web Portal using RADIUS

Logging in via your organisation’s FortiGate web portal will now have an additional step to authenticate via OTP using RADIUS.

Step 1:Browse to FortiGate portal public IP address that has been configured for your organisation.

Step 2: Enter valid Username and Password. In this example, we use the Local User account we created earlier.

Figure 12 Enter username and password to login to the portal

Step 3: Received the OTP via SMS, Email or Push message.

Step 4: Enter OTP from SMS/Email or Soft Token app if activated.

Figure 13 Enter the OTP received on your mobile device

Step 5: If the OTP entered tallies, you will successfully log in to the portal.

Figure 14 Log in Successful

3.7 Access via FortiClient agent using RADIUS

You can also access the portal via FortiClient Agent.

Step 1: Download FortiClient agent.

Step 2: Create new VPN Connection and fill up the following fields:

  1. Connection Name
  2. Description
  3. Remote Gateway
Figure 15 Create VPN connection in FortiClient Agent
Step 3: Go to REMOTE ACCESS. Select VPN Name and enter valid Username and Password.
Figure 16 Login via FortiClient Agent

Step 4: Receive the OTP via SMS, Email or Push message.

Step 5: Enter OTP from SMS/Email or Soft Token app if activated.

Figure 17 Enter the OTP received on your mobile device

Step 6: Successfully connect to FortiGate.

Figure 18 Successfully Connect via FortiClient Agent

4.0 Configuring SAML for OTP

You can also use SAML method for sending OTP. Configure FortiGate as the Service Provider in SendQuick Conexa and SendQuick Conexa as the Identity Provider in FortiGate.

4.1 Configure SAML Service Provider on SendQuick Conexa

Step 1: On the SendQuick Conexa dashboard, navigate to

SAML SP Configuration > SP Configuration

Step 2: Click on Add New SP.

Step 3: Fill in the following fields:

  1. Service Provider Name
  2. Service Provider Entity ID: Enter dummy data first if unsure
  3. Service Provider ACS URL(Login): Leave it blank first if unsure
  4. ACS Binding
  5. Service Provider SLS URL(Logout): Leave it blank first if unsure
  6. SLS Binding
  7. Sign Assertion: Default is disabled
  8. Sign Response: Default is enabled
  9. Encrypt Assertion: Default is disabled
  10. Template: Choose from predefined template or upload own portal login UI.
Figure 19 Add New Service Provider

Step 4: Click Save and then click on “SSO” tab. Copy IDP details or download metadata. These are required to create SAML profile at FortiGate.

Download metadata or gather the following details from SendQuick Conexa.

  1. Service Provider Entity ID
  2. Service Provider ACS URL(Login)
  3. Service Provider SLS URL(Logout)
  4. IDP Issuer
  5. IDP SSO URL
  6. IDP SLO URL
  7. X.509 Certificate
Figure 20 Download the Metadata to be entered into FortiGate

Step 5: Go to “Authentication” tab. Fill up the following fields:

  1. SAML Authentication Type – Select “Two Factor Access Challenge”
  2. Authentication Server – Select where the Authentication server is. In this example we will use Local User
  3. Check the following boxes -Enable Soft Token, Enable SingPass (optional) and enter SingPass Client ID, Enable OTP
  4. OTP Delivery Method – Enable SMS OTP and/or Email OTP
  5. User Contact List – Select where your user contact is. In this example we use Local User
Figure 21 Configure SAML Authentication

Step 6: Click Save and then click on “Parameters” tab. Check the source of NameID attribute. Check “Same as authentication server” and set Parameter Value to “Login ID”.

Step 7: Add new parameter “userid” and set the source to retrieve it. This will be the username sent to FortiGate.

Figure 21 Parameters for Login
4.2 Configure Identity Provider on FortiGate

Next, we configure SendQuick Conexa as the Identity Provider on FortiGate.

Step 1:Gather the following details from ConeXa.

  1. Service Provider Entity ID
  2. Service Provider ACS URL(Login)
  3. Service Provider SLS URL(Logout)
  4. Identity Provider ID: IDP Issuer from SendQuick Conexa
  5. Identity Provider Certificate: Upload new cert from X.509 Certificate from SendQuick Conexa
  6. Identity Provider SSO URL: IDP SSO URL from SendQuick Conexa
  7. Identity Provider SLO URL: IDP SLO URL from SendQuick Conexa
  8. SAML HTTP Binding for SSO Requests to IDP: Select “Redirect”
  9. SAML HTTP Binding for SLO Requests to IDP: Select “Redirect”

Step 2: Login to FortiGate CLI via Web or SSH. Run the commands to add remote certificate.

config vpn certificate remote         
      edit REMOTE_CERT_CONEXA
               set remote set remote “<PASTE X.509 Certificate from ConeXa>”
    next
end

				
					FortiGate-60E-POE # config vpn certificate remote
FortiGate-60E-POE (remote) # edit REMOTE_CERT_CONEXA
FortiGate-60E-POE (REMOTE_CERT_CONEXA) # set remote "-----BEGIN CERTIFICATE-----
MIIDSjCCAjKgAwIBAgIBADANBgkqhkiG9w0BAQsFADA+MRUwEwYDVQQDDAwxNjE4
MjE5Mzk0NDkxCzAJBgNVBAYTAlNHMQswCQYDVQQIDAJTRzELMAkGA1UECgwCU0cw
HhcNMjEwNDEyMDkyMzE0WhcNMjIwNDEyMDkyMzE0WjA+MRUwEwYDVQQDDAwxNjE4
MjE5Mzk0NDkxCzAJBgNVBAYTAlNHMQswCQYDVQQIDAJTRzELMAkGA1UECgwCU0cw
ggEiMA0GCSqGSIb3DQEBAQUAA4IBDwAwggEKAoIBAQCnYGFSL/UISjlrch7J45JD
5Ve7CPYHfxxq6lhLzE7gBCjlQKugd56x5uB0oR2nlpvRNGPR0gc2YHyUfdBA2xjF
KGzF4tywyubSACi6I1tSUZ0wYH+E2A/5E4GEW5hL/UmOQt1SRd+/3Yl5M+YrXPbj
J8rP/plYJkAycPjpbTvfPrYl0x0Ex1K1/NemchEWxa+sQJQJC4TDYqWyN+8hlbRY
OTVrIHYyBSSm08o4FY4W1b3ljYneE3SduihK5WjyKFsFf+xNYtphQby16VrGvxQm
/IlZZYtaD1X7IsaxkTD1TV6VbZGhLnEfjMFQA9rpyVOWXM+tk8uTSNwcaul+732J
AgMBAAGjUzBRMB0GA1UdDgQWBBRs8xWX0Bv1FymsFDcYmaz1sQl5NDAfBgNVHSME
GDAWgBRs8xWX0Bv1FymsFDcYmaz1sQl5NDAPBgNVHRMBAf8EBTADAQH/MA0GCSqG
SIb3DQEBCwUAA4IBAQAg4icNiTxusI56+zsvgBYINr6uSjIEGO8wTYo7MXy7B4Ja
5Ms2WePLdsytc8qwyDqOONNJ+fnVlRFa2O3ZClex0XXF47B6CsqaHQjPCKl0r9lj
NfRsgDcblWo19urijJHpeuE7AIETrvZnbix+cqapb18UAVDhFPRICYuJTSNBVPWS
9LyWCQYt2t4vdOcuYLroT+T5G9332AXvca87/4uPDU9SDF+WKKtcmIipux9amoaM
7nVHcva7nL7Gy05Hbs3b486OoY9rv0tu5fU0ymrl9ip865LtEokE5cV8UcLeoMHm
xJdJ23Wour2Ge3aSfjPWsrzmJYUJ2r8ul8/+zoA3
-----END CERTIFICATE----- "
FortiGate-60E-POE (REMOTE_CERT_CONEXA) # next
FortiGate-60E-POE (remote) # end


*** When configuring remote cert, enter opening double quote (“) first, paste the certificate from ConeXa and then enter closing double quote (“)

Step 3: Run the following commands to setup SAML.

				
					config user saml
edit "fac-sslvpn"
 set entity-id "<Service Provider Entity ID>"
 set single-sign-on-url "<Service Provider ACS URL(Login)>"
 set single-logout-url "<Service Provider SLS URL(Logout)>"
 set idp-entity-id "<IDP Issuer>"
 set idp-single-sign-on-url "<IDP SSO URL>"
 set idp-single-logout-url "<IDP SLO URL>"
 set idp-cert "REMOTE_CERT_CONEXA"
 set user-name "userid"
 set digest-method sha1
 next
end


For example,

				
					FortiGate-60E-POE # config user saml

FortiGate-60E-POE (saml) # edit fac-sslvpn
FortiGate-60E-POE (fac-sslvpn) # set entity-id "https://202.186.118.239/remote/saml/metadata/"
FortiGate-60E-POE (fac-sslvpn) # set single-sign-on-url "https://202.186.118.239/remote/saml/login/"
FortiGate-60E-POE (fac-sslvpn) # set single-logout-url "https://202.186.118.239/remote/saml/logout/"
FortiGate-60E-POE (fac-sslvpn) # set idp-entity-id
"https://conexa300.sendquickasp.com/otp/idp/metadata/?n=161821939449"
FortiGate-60E-POE (fac-sslvpn) # set idp-single-sign-on-url
"https://conexa300.sendquickasp.com/otp/idp/?n=161821939449"
FortiGate-60E-POE (fac-sslvpn) # set idp-single-logout-url
"https://conexa300.sendquickasp.com/otp/idp/logout.php?n=161821939449"
FortiGate-60E-POE (fac-sslvpn) # set idp-cert "REMOTE_CERT_CONEXA"
FortiGate-60E-POE (fac-sslvpn) # set user-name "userid"
FortiGate-60E-POE (fac-sslvpn) # set digest-method sha1
FortiGate-60E-POE (fac-sslvpn) # next
FortiGate-60E-POE (saml) # end


*** To enter “?” in CLI, Press CTRL + V once, and then press “?”

4.3 Accessing FortiGate SSL VPN Web Portal using SAML

Logging in via your organisation’s FortiGate web portal will now have an additional step to authenticate via OTP using SAML.

Step 1: Browse to FortiGate portal public IP address that has been configured for your organisation. Click on “Single Sign-On”, you will be redirected to SendQuick Conexa SAML login page.

Figure 23 FortiGate SSL VPN login page

Step 2: Enter valid Username and Password. In this example, we use the Local User account we created earlier.

Figure 24 SAML login page

Step 3: Receive the OTP via SMS, Email or Push message.

Step 4: Enter OTP from SMS/Email or Soft Token app (if activated.)

Figure 25 Enter OTP received on mobile device

Step 5: Alternatively, click on “Log in with Singpass” button. You will be redirected to Singpass login page and scan Singpass QR to login.

Step 6: Alternatively, click on “Log in with Passkey / Security keys” and complete authentication with your passkey or physical security key like Yubikey.

Step 7: Upon successful authentication of OTP or Singpass, login will be succes

Figure 26 Login Successfully
4.6 Access via FortiClient agent using SAML

You can also access the portal via FortiClient Agent.

Step 1: Download FortiClient agent.

Step 2: Create new VPN Connection and fill up the following fields:

  1. Connection Name
  2. Description
  3. Remote Gateway
  4. Enable Single Sign On (SSO) for VPN Tunnel
Figure 27 Create SSO VPN connection in FortiClient Agent

Step 3: Select VPN Name and click on “SAML Login”

Figure 28 Login via FortiClient Agent

Step 4: A new browser window “SAML IDP Login” will pop up and prompt you to login. Enter your local user ID and password, click Sign In.

Figure 29 SAML Login page

Step 5: Receive the OTP via SMS, Email or Push message.

Step 5: Enter OTP from SMS/Email or Soft Token app if activated.

Figure 30 Enter the OTP received on your mobile device

Step 6: Successfully connect to FortiGate.

Figure 31 Successfully connect to FortiGate.