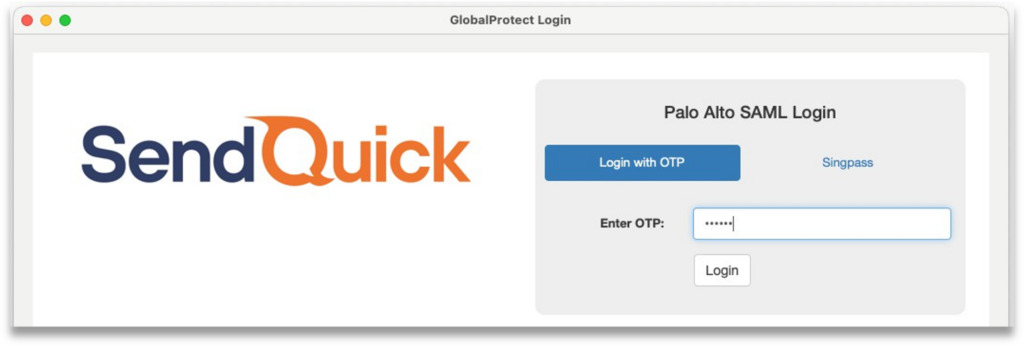
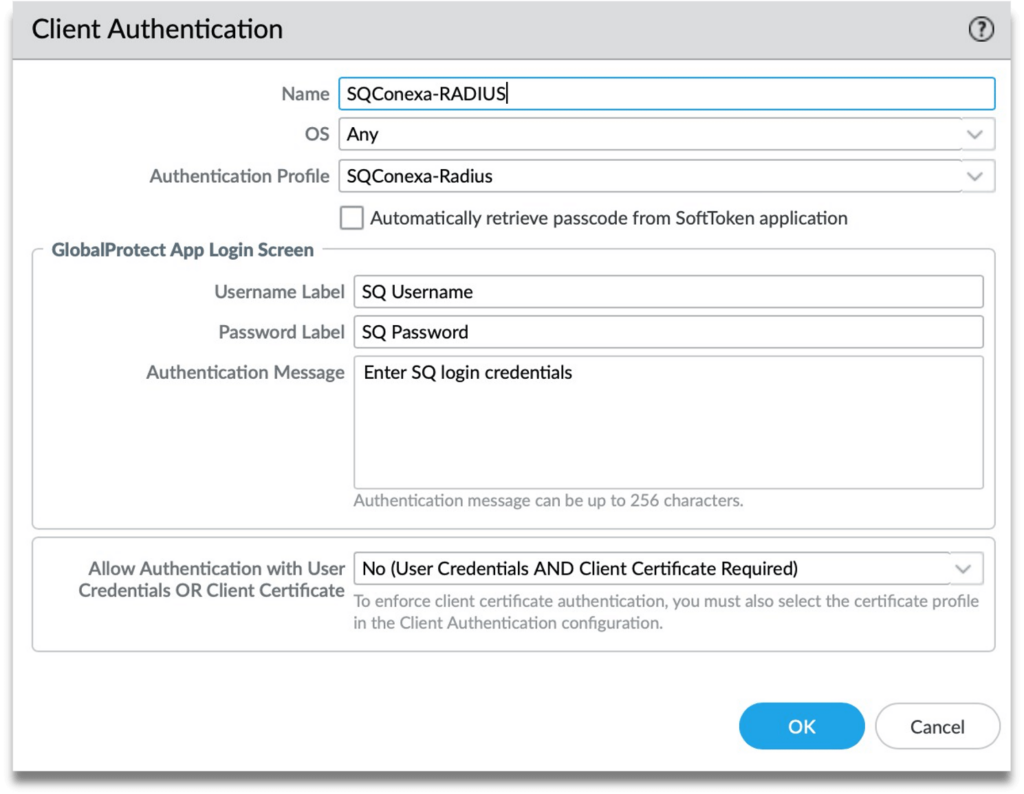
Palo Alto Networks – SendQuick Conexa | One-Time-Password Configuration Guide 

Contents

1. Purpose of Document

This document is prepared as a guide to configure Palo Alto Networks to integrate with SendQuick Conexa for multi factor authentication. Palo Alto can use either RADIUS or SAML to connect with SendQuick Conexa.

For RADIUS connection, ensure that both applications are using the same port for Radius. SendQuick Conexa OTP server is configured with RADIUS on port 1812.

For SAML connection, SendQuick Conexa need to be accessible from the Internet to host the SAML login portal for user login.

This integration was tested on Palo Alto Networks version 10.1.6-h3 and SendQuick Conexa version 20150611-10HF4

2.0 Create User on SendQuick Conexa

Prior to configuring the connection via RADIUS or SAML, we must first create the user in SendQuick Conexa.

2.1 Creating user on SendQuick Conexa (Local User authentication)

SendQuick Conexa can authenticate user by authenticating against local user database, Active Directory/LDAP, external Radius server and remote database server.

For this guide, we will create a local user as an example.

Step 1: On the SendQuick Conexa dashboard, navigate to

User Management > All Users 

Step 2: Click on New User

Step 3: Fill in the following fields:

  1. Login ID
  2. Username
  3. Password
  4. Confirm Password
  5. Mobile Number
  6. Email
  7. Role
Figure 1: Creating “User” under Local User
2.2 Create Soft Token user (SendQuick OTP)

This is to create a user to be able to login using soft token. We will be using SendQuick OTP app as the soft token.

Step 1: On the SendQuick Conexa dashboard, navigate to

Soft Token Management > Soft Token Users 

Step 2: Click on New User

Step 3: Fill in the following fields:

  1. Login ID
  2. VPN / WebOTP -Allow this soft token user to login to All or single VPN profile by selecting from the dropdown list.
  3. Method Check SendQuick OTP and/or Singpass (Singpass is only available for SAML profile)
  4. Email After activated, user will receive soft token QR and/or Singpass registration link to this email.
  5. Mobile Number After activated, user will receive SMS notification to this number.
Figure 2: Add Soft Token User

3.0 Configuring Radius for OTP

To use Radius method, we first configure SendQuick Conexa as the Radius server and Palo Alto as the Radius Client. Before the configuration, you will need to know the IP address/hostname for both systems.

3.1 Configure Radius Client on SendQuick Conexa

On SendQuick Conexa, configure Palo Alto Networks as the Radius Client.

Step 1: At the SendQuick Conexa dashboard, navigate to the following:

Radius OTP Configuration > Radius Client Configuration

Step
2: Click on New Radius Client

Figure 3: Add New Radius Client

Step 3: Fill up the following fields:

  1. Radius Client IP – This is the IP Address of Palo Alto Networks system.
  2. Name – Create a unique name to identify this Radius Client.
  3. Shared secret – Define a shared secret key that needs to be configured later in the Palo Alto system.
Figure 4: Configure Radius Client
3.2 Configure Radius Server on Palo Alto Networks

On Palo Alto Networks, configure SendQuick Conexa as the Radius Server.

Step 1: At the Palo Alto Networks dashboard, navigate to the following:

Device > Server Profiles > RADIUS

Step 2: Click “Add”  at the bottom of the screen to add a new Radius Server Profile.

Step 3: Fill up the following fields:

  1. Profile Name – Create a name to identify this Radius Server Profile.
  2. Timeout (sec) Set a timeout duration either 60s to 180s for user to enter OTP.
  3. Retries – Set the number of retries.
  4. Authentication Protocol – Select “PAP” from the dropdown list.

Step 4: Click “Add” to add new Server and key in the following:

  1. Name: Create a unique name to identify this Radius Server.
  2. RADIUS Server: Enter your SendQuick Conexa IP or hostname.
  3. Secret: Same secret as configured in Conexa Radius Client Configuration in the previous section.
  4. Port: 1812.
Figure 5: Configure Radius Server Profile
3.3 Add Authentication Profile on Palo Alto Networks

Add an authentication profile on Palo Alto Networks that later needs to be linked to SendQuick Conexa VPN configuration.

Step 1: At the Palo Alto Networks dashboard, navigate to the following:

Device > Authentication Profile

Step 2: Click “Add” at the bottom of the screen to add a new Authentication Profile.

Step 3: Under “Authentication” tab, fill up the following fields:

  1. Name – Create a unique name to identify this Authentication Profile.
  2. Type – Select “RADIUS” from the dropdown list.
  3. Server Profile – Select the Radius Server Profile that was created earlier from the dropdown list.
Figure 6: Configure Authentication Profile for RADIUS

Step 4: Under “Advanced” tab, add user or user group in the Allow List to use this profile.

Figure 7: Configure Authentication - Allow Users
3.4 Add VPN Configuration on SendQuick Conexa

Configure  VPN  profile  on  SendQuick  Conexa  to  link  to  the  Palo  Alto Networks Authentication Profile.

Step 1: At the SendQuick Conexa dashboard, navigate to the following:

Radius OTP Configuration > VPN Configuration

Step
2: Click on Add VPN.

Figure 8: Add new VPN

Step 3: Fill up the following fields:

  1. NAS-IP/NAS-ID NAS-IP-Address or NAS-Identifier used in the Radius request. It is usually the Palo Alto Networks interface IP or the Radius authentication profile name that was created earlier.
  2. Name – Create a unique name to identify this VPN configuration.
  3. Authentication Type Select Two Factor Access Challenge from the dropdown list.
  4. Check the following boxesEnable Soft Token & Enable OTP.
  5. OTP Delivery Method Select SMS & Email.
  6. User Contact List Check Same as Authentication Server.
Figure 9: VPN Configuration
Figure 10: VPN Configuration (continue)
3.5 Configure GlobalProtect on Palo Alto Networks to use RADIUS

GlobalProtect is Palo Alto Networks’ VPN solution.

Step 1: At the Palo Alto Networks dashboard, navigate to the following:

Network > GlobalProtect > Portals

Step 2: Add or Edit an existing Portal Configuration.

Step 3: Click on Authentication and add a new Client Authentication and set it to Radius authentication profile we created for SendQuick Conexa.

Move this up and set it as the first client authentication profile if you have multiple entries in the list.

Figure 11: Link GlobalProtect Portal to RADIUS Authentication Profile

Click on the name of the Client Authentication and provide the labels for the login screen. See example below:

Figure 12: Client Authentication Set Up for RADIUS

3.6 Accessing GlobalProtect Web Portal using RADIUS

Logging in via your organisation’s GlobalProtect web portal will now have an additional step to authenticate via OTP using RADIUS.

Step 1: Browse to GlobalProtect portal public IP address that has been configured for your organisation.

Step 2: Enter valid Username and Password. In this example, we use the Local User account we created earlier.

Figure 13: Enter username and password to login to the portal

Step 3: Received the OTP via SMS, Email or Push message.

Step 4: Enter OTP from SMS/Email or Soft Token app if activated.

Figure 14: Enter the OTP received on your mobile device

Step 5: If the OTP entered tallies, you will successfully log in to the portal.

Figure 15: Log in Successful

3.7 Access via GlobalProtect agent using RADIUS

You can also access the portal via GlobalProtect Agent.

Step 1: Download GlobalProtect agent from web portal.

Step 2: Enter your public portal address and click on Connect.

Step 3: Enter your local user ID and password, click Sign In.

Figure 16: Login via GlobalProtect Agent

Step 4: Receive the OTP via SMS, Email or Push message.

Step 5: Enter OTP from SMS/Email or Soft Token app if activated.

Figure 17: Figure 17 Enter the OTP received on your mobile device

Step 6: Successfully connect to GlobalProtect.

Figure 18: Successfully Connect via GlobalProtect Agent

4.0 Configuring SAML for OTP

You can also use SAML method for sending OTP. Configure Palo Alto Networks as the Service Provider in SendQuick Conexa and SendQuick Conexa as the Identity Provider in Palo Alto Networks.

4.1 Configure SAML Service Provider on SendQuick Conexa

Step 1: On the SendQuick Conexa dashboard, navigate to

SAML SP Configuration > SP Configuration

Step
2: Click on Add New SP.

Step 3: Fill in the following fields:

  1. Service Provider Name
  2. Service Provider Entity ID: Enter dummy data first if unsure
  3. Service Provider ACS URL(Login): Leave it blank first if unsure
  4. ACS Binding
  5. Service Provider SLS URL(Logout): Leave it blank first if unsure
  6. SLS Binding
  7. Sign Assertion: Default is disabled
  8. Sign Response: Default is enabled
  9. Encrypt Assertion: Default is disabled
  10. Template: Choose from predefined template or upload own portal login UI.


Figure 19: Add New Service Provider

Step 4: Click Save and then click on “SSO” tab. Copy IDP details or download metadata.

These are required to create SAML profile at Palo Alto.

Download metadata or gather the following details from SendQuick Conexa.

  • Service Provider Entity ID
  • Service Provider ACS URL(Login)
  • Service Provider SLS URL(Logout)
  • IDP Issuer
  • IDP SSO URL
  • IDP SLO URL
  • X.509 Certificate
Figure 20: Download the Metadata to be entered into Palo Alto Networks

Step 5: Go to “Authentication” tab. Fill up the following fields:

  1. SAML Authentication Type Select “Two Factor Access Challenge”
  2. Authentication Server Select where the Authentication server is. In this example we will use Local User
  3. Check the following boxesEnable Soft Token, Enable SingPass (optional) and enter SingPass Client ID, Enable OTP
  4. OTP Delivery Method – Enable SMS OTP and/or Email OTP
  5. User Contact List Select where your user contact is. In this example we use Local User
Figure 21: Configure SAML Authentication

Step 6: Click Save and then click on “Parameters” tab. Check the source of NameID attribute. Check “Same as authentication server” and set Parameter Value to “Login ID”.

Step 7: Add new parameter “username” and set the source to retrieve it. This will be the username sent to PaloAlto.

Figure 22: Parameters for Login
4.2 Configure Identity Provider on Palo Alto Networks

Next, we configure SendQuick Conexa as the Identity Provider on Palo Alto Networks.

Step 1: At the Palo Alto Networks dashboard, navigate to the following:

Device > Server Profiles > SAML Identity Provider

Step 2: Click “Import” and upload the metadata(.xml) that was downloaded earlier.

Figure 23: Import SAML IDP Server Profile

Step 3: Alternatively, you can also add the profile manually. Fill up the following fields:

  1. Profile Name
  2. Identity Provider ID: IDP Issuer from SendQuick Conexa
  3. Identity Provider Certificate: Upload new cert from X.509 Certificate from SendQuick Conexa
  4. Identity Provider SSO URL: IDP SSO URL from SendQuick Conexa
  5. Identity Provider SLO URL: IDP SLO URL from SendQuick Conexa
  6. SAML HTTP Binding for SSO Requests to IDP: Select “Redirect”
  7. SAML HTTP Binding for SLO Requests to IDP: Select “Redirect”
Figure 24: Fill in SAML IDP Server Profile
4.3 Configure Authentication Profile on Palo Alto Networks

Step 1: At the Palo Alto Networks dashboard, navigate to the following:

Device > Authentication Profile

Step 2: Add a New Authentication Profile

Step 3: At “Authentication” tab, fill up the following fields:

  1. Name – Create a unique name for this Authentication Profile
  2. Type – Select “SAML” from the dropdown list
  3. IdP Server Profile: Select SendQuick Conexa IdP profile
Figure 25: Create Authentication Profile for SAML

Step 4: Under “Advanced” tab, add user or user group in the Allow List to use this profile.

Figure 26: Configure Authentication - Allow Users

Step 5: Once created, click on the Metadata link and export the SAML metadata.

Figure 27: Figure 27 List of Authentication Profile – Select “Metadata” to export

Step 6: Select “global-protect” service and your public IP or Hostname. Click OK and save the metadata.

Figure 28: Export SAML Metadata

Step 7: Open the metadata(.xml) file and copy the details and update to SendQuick Conexa. Navigate on SendQuick Conexa dashboard to SAML Service Provider, info tab.

  1. EntityID Update Service Provider Entity ID in SendQuick Conexa
  2. AssertionConsumerService Location – Update Service Provider ACS URL(Login) in SendQuick Conexa
  3. SingleLogoutService Location Update Service Provider SLS URL(Logout) in SendQuick Conexa
Figure 29: Update Metadata on SendQuick Conexa SAML config
4.4 Configure GlobalProtect on Palo Alto Networks to use SAML

GlobalProtect is Palo Alto Networks’ VPN solution.

Step 1: At the Palo Alto Networks dashboard, navigate to the following:

Network > GlobalProtect > Portals

Step 2: Add or Edit an existing Portal Configuration.

Step 3: Click on Authentication and add a new Client Authentication and set it to SAML authentication profile we created for SendQuick Conexa. Move this up and set it as the first client authentication profile if you have multiple entries in the list.

Figure 30: Link GlobalProtect Portal to SAML Authentication Profile

Click on the name of the Client Authentication and provide the labels for the login screen.

See example below:


Figure 31:Client Authentication Set Up for SAML
4.5 Accessing GlobalProtect Web Portal using SAML

Logging in via your organisation’s GlobalProtect web portal will now have an additional step to authenticate via OTP using SAML.

Step 1: Browse to GlobalProtect portal public IP address that has been configured for your organisation. You will be redirected to SendQuick Conexa SAML login page.

Step 2: Enter valid Username and Password. In this example, we use the Local User account we created earlier.

Figure 32: SAML login page

Step 3: Receive the OTP via SMS, Email or Push message.

Step 4: Enter OTP from SMS/Email or Soft Token app (if activated.)

Figure 33: Enter OTP received on mobile device

Step 5: Alternatively, click “Singpass” tab and click on Log in with Singaoss button. You will be redirected to Singpass login page and scan Singpass QR to login.

Figure 34: Using Singpass for authentication

Step 6: Upon successful authentication of OTP or Singpass, login will be successful.

4.6 Access via GlobalProtect agent using SAML

You can also access the portal via GlobalProtect Agent.

Step 1: Download GlobalProtect agent from web portal.

Step 2: Enter your public portal address and click on Connect.

Figure 35 : Login via GlobalProtect Agent

Step 3: A new browser window “GlobalProtect Login” will pop up and prompt you to login.

Step 4: Enter your local user ID and password, click Sign In.

Figure 36 : SAML Login page

Step 5: Receive the OTP via SMS, Email or Push message.

Step 6: Enter OTP received from SMS/Email or Soft Token app (if activated.)

Figure 37:Option to use OTP or Singpass

Step 7: Alternatively, click “Singpass” tab and scan Singpass QR to login.

Step 8: Upon successful authentication, you will be connected to GlobalProtect

Figure 38 : Connected to VPN